Sunday, May 27, 2012

Almond tea + Cinnamon Kringle = Yumminess :)

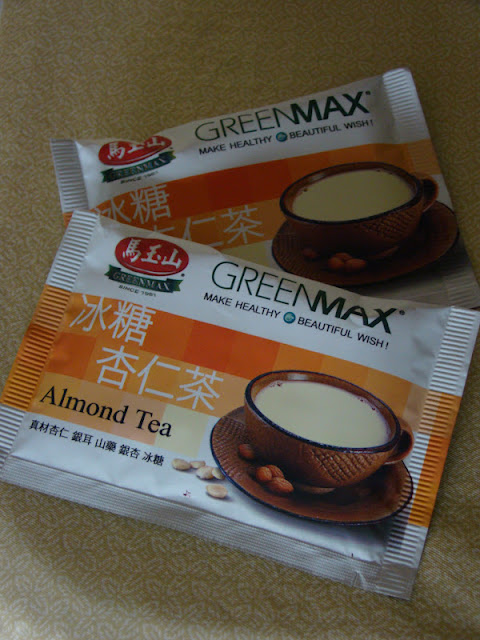
I tried the most delicious tea ever, so good that I had to share it with you. I never bought this tea myself, my sister gave me this tea to try which she got from a friend and now I have to admit I'm wanting more and need to find some asap. The tea is almond tea, it's slightly sweet, nutty, and has a wonderful almond flavor. Just get out your favorite cup, boil some water add almond tea, stir, sit back and enjoy. It makes the perfect healthy, low calorie dessert...yes it's that good :) Now my mission is to find more of this wonderful, delicious tea, if you happen to find some try it is so good....yum! 


Almond Tea...So Delicious!! 


A cup of wonderful, almondy delight :)

Okay so we got that out of the way now onto something just as wonderful and delicious. Cinnamon Kringle...yum!! I first saw this beautiful and delicious sweet dough treat on Pinterest. You can find the originally post here but it is in Romanian language so instead of trying to translate the recipe I just used my own sweet dough recipe and filling. I just followed the steps how to shape it and it is really, really simple but oh so good.

Because the dough is rolled up and then twist into a braid the result is delicious layer up on layer of sweet dough, cinnamon, sugar and walnuts. The originally recipe doesn't call for nuts but I love nuts so I added walnuts . Unfortunately I didn't have almonds otherwise I would have definitely used them. 

I posted my sweet dough recipe in an earlier post you can find it here which I use to make Apricot Piroski as well but I will repost again. This recipe is a larger portion recipe it will make 8-9 Cinnamon Kringles, you can cut ingredients in half if desired , use 2 eggs if doing so.

Sweet Dough ~

 Ingredients:

1/2 cup warm water
1 tablespoon yeast

Pour the warm water into a small bowl, sprinkle the dry yeast onto the water and set aside to develop. Yeast will dissolve, foam and become bubbly when ready. 

7 cups all purpose flour
2 1/2 cups warm milk
4 tablespoons melted butter
1 Tablespoon olive oil
1/2 cup sugar
1 teaspoon salt
3 eggs (room temperature)

In a large mixing bowl combine warm milk, melted butter, olive oil, sugar and salt. Add eggs and blend mixture well. Add the developed yeast mixture and stir to combine. Start adding flour one cup at a time. You can use a wooden spoon but I find that stirring in the flour by hand works best. Add flour until you have a soft, sticky dough. You may need to adjust the amount of flour you add, therefore don't just add the whole amount at once. It's better to have a softer, sticky dough because you can add more flour when your kneading the dough. If you add too much flour the dough will be tough and stiff. Your pastries will not be as light, fluffy and soft if the dough is to stiff.  

Once you've added enough flour to make a soft dough, turn the dough out onto a lightly floured work surface. Knead the dough, until the texture goes from soft and sticky to smooth and pliable. Tuck in edges of dough, shaping it into a ball   Lightly oil the bowl and place gently place the dough ball back in the bowl (seams down). Covered the bowl with plastic wrap and a clean dish towel, put in a warm place to allow dough to rise and double in size.

While the dough is rising you can prepare the Cinnamon Sugar Walnut filling.


~ Cinnamon Sugar Walnut Filling ~

4 cups brown sugar
8 tbsp ground cinnamon - you can use less or more
2 finely chopped walnuts 

Combine the ingredient in all together in a  bowl. Set aside.

3/4 cup butter

In a small pot melt 3/4 butter. Set aside.


Once the  dough has doubled  you can start making the Cinnamon Kringle.


I first start by portioning the dough out. Just pinch off approximately the same size pieces of dough with your hands. Just very lightly fold in to shape into a circle, don't work the dough a lot. 


Once all the dough is portioned out, cover the dough balls with plastic sheets. I use up-cycled cereal bags. Click here  for up-cycled cereal tutorial.


Work with one dough ball at a time.


Roll out into a rectangle shape. You can gently pull and shape the dough with your hands. Roll out dough 1/2 thickness.


Brush the rolled out dough with melted butter. Be generous...butter is good. 


Sprinkle with cinnamon and walnut sugar.


Leave about a 1/2 inch dough unsprinkled so it's easier to pinch dough roll shut. Be generous with the cinnamon sugar but don't go overboard as it will make it hard to twist the dough.


Roll up the dough fairly tightly, try to keep edges even, pull them out gently if needed.


Pinch the roll shut. Turn over seam down and turn so it's  lengthwise in front of you.


Press the dough roll down to flatten slightly and cut the roll in half with a sharp knife.Leave an inch uncut at the top. Cut all the way down to the end.


After you cut it in half, carefully pull the two side apart.


Start twisting the dough one strand over the other and keeping going all the way till the end. Pinch end together.


Once you pinch the end together, cut the top uncut portion and twist it and pinch it together too.


Form the twisted log into a circle, gently pinch and fold over the ends trying to keep the shape.


Don't all those layers of dough and cinnamon sugar look so good? Just wait till it's baked and golden brown!! 


Brush the rings with an egg wash or extra melted butter. Bake at 350 degrees for 25-30 minutes until golden brown. Carefully remove from baking sheet with a spatula after cooling slightly. Remove and place on a wire rack before the cinnamon kringle cool completely because they will stick to the sheet.


Oh my!


Next time your craving cinnamon buns try making these cinnamon kringle instead. They are just as simple to make but Oh so good. 


Happy Baking,


Add caption
Source: google.ca via Katya on Pinterest

With Love,


Pin It

Tuesday, May 22, 2012

It's that time...bring on the sizzle!!

With the warmer weather approaching it's time to dust off your BBQ and get that grill fired up!! I tried a new recipe this year and I'm so excited to share it with you. I came across this recipe in December. I was surfing You Tube one snowy day and to my delight found a Russian cooking show called Kазан Mангал. The host is a man named Stalik and man, can he cook!! His mostly does outdoor grilling but with such enthusiasm and passion it's hard not to get excited watching him. Check out his site by clicking here. I knew as soon as I saw this recipe that I was going to try it and it was going to be so good. I was not disappointed and you will not be either.


So very, very patiently I waited for winter to pass... January... February...March...April and finally it was time to try this delicious mouthwatering recipe that was calling out to me all winter long.  Grilled Stuffed Vegetable Kebabs, I know, the name does this dish no justice whatsoever but don't be fooled these kebabs are outstanding.


Clear sunny skies-check, grill pulled out of storage and ready to use-check, ready to grill some delicious food-check!!! Here goes....the idea was inspired by Stalik but this is my own version, he used a lot of different herbs and spices that I chose to leave out but really all you need is the idea and then be creative use our own favorite ingredients.


~ Grilled Stuffed Vegetable Kebabs ~

1lb Ground Beef
1/2 lb Ground Pork
1/2 large or 1 medium onion
1 bunch of green onions
3-4 cloves of garlic
1 Tbsp paprika
1/2 Tbsp cayenne pepper
Salt  to taste
3 Long thin eggplants
4-5 Zucchini
1-2 Leeks
2-3 Long sweet red peppers


Ground beef, Ground pork, onions, green onions, garlic, salt, pepper and paprika mixed with cayenne pepper.


Long thin eggplantzucchini, leeks.


Peel the onions and garlic. Finely chop the onions, the green stalk part of the leeks and garlic. Keep the bottom part of the leeks to stuff with meat filling, set aside for now. Place the ground beef and pork into a large mixing bowl.


Add finely chopped onions, garlic, chopped green onion. finely chopped green leek tops, salt, paprika and cayenne pepper.


Mix ingredients together until thoroughly combined.

Once the meat filling is mixed, cover with saran wrap and put into the fridge. You can make this part 2-3 hours ahead of grilling time. This allows the meat to marinate and incorporate all the flavours.


About 1 hour prior to grilling prepare the vegetables to stuff with meat filling. Cut the bottom part of the leeks into 3 cm long pieces and very carefully push the rings out one by one.


Separate the cut leek pieces into individual rings. Cut the zucchini into 3 cm long piece. Carefully cut out the centers with a small paring knife, so there's a hollow center, save the inside part to use for something later. 


 Cut the eggplant into 3 cm long pieces too. Hollow out the center with a paring knife, save the inside and use it to make stir fry or something else. Unfortunately I couldn't find any long red peppers to stuff so I made extra zucchini rounds but next time I'm definitely trying the peppers :)  


After the vegetables are all cut, separated and hollowed out sprinkle the vegetables with salt. Sprinkle salt in the inside of the zucchini and eggplant too.

 At this point in time get your grill going. I use a grill that is made specially for kebabs and shashlik. The width is the perfect size for the skewers, it's made out of metal and I can start the fire with wood and add charcoal closer to grilling time. I prefer using charcoal to grill. 


The dry, white-hot heat of charcoal sears meat quickly, creating a crusty, caramelized exterior and smoky flavor.  You can use whatever method you prefer, a small charcoal kettle grill works great and gas barbecue is fine too.  The method I use is not always convenient BUT it you ever get a chance to try grilling with charcoal DO IT, that flavour is completely different you will be amazed at the difference. 

Once you got the grill going it time to stuff the vegetables with meat.


Fill the vegetable rings with meat filling make sure to completely fill them full. Make the flush at both ends Don't cram the filling in to hard the vegetable rounds can break and crack. 


After all the vegetables are stuffed with meat it's time to skewers them.


If you have any meat filling leftover just make meat kebabs by molding the meat around the skewer.  


The meat only kebabs were so delicious too and great for any kidlet that aren't fond of the whole vegetable thing. Actual I was thinking if you had some hot dogs buns these meat skewers would be so good inside with some ketchup, maybe fried onion....yum!!


Charcoal white hot....ready to grill!


When you first start grilling the skewers, sear both ends first, this way the meat has a browned crust that stops the meat filling from falling out of the ends.   


Turn the meat/vegetable skewers over continually to get an even grill on all sides.
Lightly sprinkle with salt if needed.


Oh my, don't they look so delicious?


~ Stuffed Eggplant 


~ Stuffed Zucchini ~


Visual aid always helps ;) now if only I could add smell...sizzling!!


Keep grilling until the meat is cook all the way through, no pink inside and the vegetables are tender. 


Remove from the grill and let the skewers rest for 5 minutes, (if you can). Serve with your favorite side dish and dig in!!

I hope you try this recipe for yourself, I know you'll be so glad you did. 

Definitely two thumbs up!!


Thanks for stopping by and Happy Grilling:)


Food Clip Art


Love,


Pin It

Saturday, May 12, 2012

SweetBakedLove is off to the Market....


Today was the first day of the Farmers Market and after spending all day yesterday baking up a store like a mad woman I am happy to say that I pretty much sold out of everything....yay!! It was really cold this morning, which wasn't the best thing BUT it kept me awake so I can't complain. I had a great time at the market and some dear friends showed up to sell their homemade goods; it was a pleasant surprise seeing them there. Selling my home baked goods + chatting with friends + fresh air + blooming flowers + great music playing = a really great way to spend a Friday!!  

Tomato plants for sale, a vendor selling Grilled Souvlaki, pita and tzatziki... it smelled so good and a guy selling homemade Swiss sausage right across from my table....I sampled those...yummo!!

There something about Farmers Markets that I just love. No matter where it is or when it is, it's brings a nostalgic feeling of times when things were just simpler. Nothing fancy schmancy just some great home baking, farm fresh products, crafts, gardening supplies, live music and so much more. I love it. 


A little video I filmed at the market, the live music was great, I swear I felt like I was Laura Ingalls from Little House on the Prairies for a few brief moments, listening to that song. Only thing missing was a horse and buggy....

Once I had my table all set up, off I went to check out my fellow vendors. Before you know it I found a  lovely lady selling Linzer Torte (anytime you can buy Linzer Torte from a Swiss lady with an accent, do it...just saying) next thing you know I found a really pretty plant I just simply needed. Boy, I looked like a overgrown kid in a candy store....ah, the good ole' days .


 Well I could go on and on explaining to you how I feel about the Farmers Market and what it's like but the best way to find out is firsthand. It's Farmers Market time all over the province get out with your friends and families and go to one today!! When you shop at the Farmers Market you help keep BC farmers farming and BC bakers baking. Come join the fun :)


~ Homemade Apple and Strawberry Rhubarb Pie ~


Strawberry Rhubarb Crumble Pie


All my goods wrapped and ready to go...

I made homemade pies, cinnamon buns, sweet dough pastries with apricot and date filling, squares and cookies. I made different varieties of each kind of baked goods I listed BUT my favorite thing was a Russian sweet treat called Gorka aka Hill !!


Wonderful Sweet Squares called Gorka!

Okay if I translate it from Russian to English, it would be called "hill". How original hey, it's a Russian thing I think, when it comes to naming things we keep it simple. I had a few cats named "Kошка" which simply means cat. See simple! Well let me tell you when it come to these bars they are anything but simple, I mean taste wise. They are made out of a sweeten unleavened dough which is rolled out and cut into thin strips, then the strip of dough are deep fried till light, airy, and slightly golden, kind of like puff pastry . Once all the dough strips are fried you make a honey and sugar mixture that is warmed up, pour the sweet golden mixture all over the fried dough strips. Stir to coat all the fluffy dough strip with the honey mixture and press into a pan. Cool, cut into pieces and indulge. D.E.L.I.C.I.O.U.S. I can't even begin to imagine how to explain the taste all I know is once you try it you can't stop! 


These squares are so delicious I'm going to share the recipe with you today. Have fun making the "Hill" aka Gorka.


~Gorka~

First start by preparing the oil for deep frying. You can use a deep fryer, follow manufactures direction to deep fry. I use a normal cooking pot with tall sides. Pour canola oil or lard in the pot no more than half full. If you have a candy thermometer get it out and ready. Set pot on burner and leave till needed. Don't turn burner on yet!!

*Always be very careful while deep-frying.*

Ingredients:
  
1 dozen eggs
1 tbsp sugar
1 tsp salt

Combine ingredients in mixing bowl. Beat well with mixer till light, foamy and frothy. Should be approx. triple in volume.

3-4 cups flour

Add 3 cups flour all at once and stir to combine to make a soft, slightly sticky dough. If this dough is really moist and sticky add the 4th cup of flour. The amount of flour used can vary depending on the size of egg I use large eggs, just keep in mind that the dough should be soft, slightly sticky not tough and hard.     

Sprinkle the work surface with a dusting of flour and lightly knead dough 2-3 minutes into a soft dough ball. Cut the dough ball into 6 even pieces and shape into balls. 

Start heating the oil at this time. Always be very careful while deep-frying. You can use a normal cooking pot (one with tall sides is best). Put the oil in the pot and put it on the stove. Begin heating the oil over medium heat. To control the temperature, you can use a thermometer. The best temperature is 350 to 375 degrees F. Just turn the heat up or down until you can maintain a consistent temperature.  While the oil is heating finish cutting dough into strips.

Lightly dust work surface with flour then roll out each piece one at a time into a round shape about 1/8 inch thickness, approximately 10 inch round. 

Cut the rounds in half and then the half in half again, length wise. You should have a circle cut into 4 lengthwise strips. Stack the strips on top of one another and with a sharp knife, cut into thin strips. See diagram. 
Carefully drop handful of dough strips into heated oil, stir lightly with metal spoon. Be careful as oil can bubble over, if oil starts bubbling up to much, stop and change the oil it will boil over and can cause a fire. **If the oil does bubble over carefully turn off burner, remove pot from burner and sprinkle baking soda on burning oil in burner.**

Fry all the dough strip till lightly golden. Remove from oil carefully with metal slotted spoon into a large bowl lined with paper towel. Finish frying all the dough strips, then set aside while you make the honey/sugar mixture.

~ Honey Mixture ~

1 cup honey
2 cups sugar

Combine the honey and sugar in a saucepan. Heat on medium high till mixture starts to boil. Remove from heat and pour all over the fried dough strips. Use a wooden or metal spoon to mix and coat all the dough strips well. *Careful mixture is hot don't mix with your hands!!*

Evenly press the mixture into a lightly greased 13x9x2 inch pan or mold into a hill shape as per tradition. Score and cut squares while still warm. Cool completely and remove squares from pan.

Enjoy!

Once all the baking was done I came up with the idea to make rustic signs to display my baking. Eight o'clock at night I was outside cutting down trees, I'm sure my neighbors think I'm a bit insane but hey, it was totally worth it they turned out to be pretty darn cute.


All said and done I had a great time and look forward to next week to another day at the Farmers Market.
Check your locally market out, you'll be pleasantly surprised :)


Pies, pies, pies....


All set up!


Sweet Dough Apricot Pastries 


Chocolate Puff Wheat Squares


~ White Chocolate Cranberry Oatmeal Cookies ~


Chocolate Chip Smarties Monster Cookies

P.S. I linked up all my favorite Farmers Markets. Just click each highlighted Farmers Market on my blog and it will open  a new page with some of my favorite Farmers Market's I've visited over the years. 


Have fun and thanks for stopping by,


Love 


Pin It